Quickly find Contacts in Outlook

This post is for anyone using an Exchange email account and accesses their account through Outlook. Scrolling through the list of all the contacts in Outlook’s Global Address Book can be cumbersome. Here is how you can improve you search for contacts when creating an email.


Step 1: Open the Address Book from a New Message

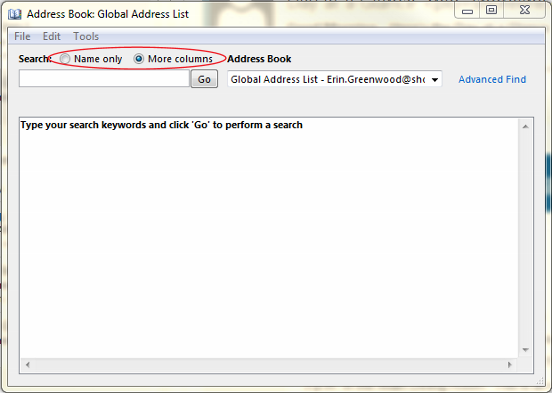
Step 2: Change Name Only to More Columns
  • Use the Advanced Find to narrow down the list of contacts
Step 3: Type in a partial name, department, location
  • Unlike searching with Name Only, More Columns search will not show any contacts until you type something in the search and hit enter/click Go.
Step 4: Select a contact and then Add to the To/Cc/Bcc lines

  • This step is the same as usual. Select a contact from the list and then click the To/Cc/Bcc line to add the contact.
  • If you have multiple contacts to add in the same area, you can select them all at once and then add them to the line:
    • To select multiple contacts at once, select the first contact, hold the Ctrl key on your keyboard and click on each of the other contacts. Let go of the Ctrl key once you have made your selections, and click whichever To/Cc/Bcc line that is appropriate. 
    • If you have a section of contacts all grouped together in the list, click and drag your cursor over the contacts you want to add. A group of contacts can also be added using a Shift Click: Select first contact, Hold the Shift key, and click on the Last contact in the group.

  • Once the contacts have been added, click ok to finalize addressing your email.

    Browser Toolbars out of Control?


    Here is a common conversation I have when helping people with their computers:

    Me: “Wow, you have a lot of toolbars installed. Do you like having those?”
    Them: “No.”
    Me: “Do you know where they came from?”
    Them: “No.”
    Me: “Do you want me to remove those?”
    Them: “Yes, please!”

    If you can relate, roll up your sleeves and lets do some spring cleaning!
    Step 1: Clean up your browsers
    This article shows quite nicely how to remove toolbars from the most prominent browsers. (As of today, these methods worked–keep in mind browsers get updates and instructions might change in the future.)
    Step 2: Don’t install more toolbars
    Where do these toolbars come from? Chances are at some point you installed a program with a toolbar included. Toolbars aren’t always malicious–companies like you to see their name plastered where ever possible. For example, notice that when Yahoo!Messenger is installed, the Yahoo! Toolbar will also be installed: 
    It’s all good if you want to have the toolbars installed. Just be aware of the choices that show up during installation and read through the installation process. Cancel and do some research if wording sounds at all fishy. 
    Step 3: Become more knowledgeable/Dig deeper
    Unfortunately, it is possible that just removing the toolbars isn’t enough. Some toolbars have bad intentions and can slow down the entire system. I found that Enigma Software Group has an extensive list and explanations of malicious toolbars.
    Here is an article that delves deeper into what’s behind malicious toolbars, symptoms you may experience, and preventative actions you can take: Sneak Attack–Those Annoying Toolbars You Never Wanted

    School Email Login Change

    Google is streamlining their services which means students can expect some changes when logging into their school email. The old address, http://go.shoreline.edu, will still work, but will no longer have the SCC look and feel. The login site will look the same as a personal Gmail account and can be also accessed at http://gmail.com. Most importantly, students will need to use their entire email address to login.


    If you already have another Gmail account associated with your browser, you will need to add an account.


    Working with Data in Tables

    One of the fastest way to get meaning from data in Excel is to insert a table. Here are some tips for getting started with Excel Tables. These tips will work for the 2007, 2010, and 2013 versions of Excel unless stated otherwise. 
    1) Insert a Table:
    • Select a cell within your data area. Go to the Insert Tab on the Ribbon and select “Table”

    • Aside from the formatting there are two details to take note of:

    2) Use the Table for fast data entry:
    • Normally in Excel, Tab moves the cell selector right and Enter moves the cell selector down. In a Table, Tab moves to the next cell in the Table. In other words, it will move right until the last column in your table, and then it will move down to the first cell in the next row. If you’re at the end of your data set, a new row is automatically added to the Table.

    3) Get instant data analysis by adding a Total Row:
    • For this next part, a cell within your table must be selected. Go to the Table Tools Design Tab. Check the Total Row box. 

    This example is shown in 2013, but you will still see the same option boxes in the previous versions.
    • Add formulas to the Total Row.

    4) Switch a table back to regular cells.
    • Select a cell in your table. From the Table Tools Design Tab, click convert to range.

    Formatting and Total Row stay put, but the other tools from the Table are removed.
    As the Table Tools Design Tab suggests, Excel can do much more with Tables. Check out Microsoft’s Support site more helpful articles and videos. The search feature works rather well if you want help with something specific. For example, type “Excel Tables” or “Excel PivotTables” to continue learning about tables.

    4102 Student Computer Lab

    The 4102 Computer Lab, located in the lower level of the Library (Building 4000) houses 100 PCs and 5 Macs for students to use to complete classwork. Here are 3 ways you can improve your experience:
    1. Come to the lab with clean hands and do not bring food. For one thing, ’tis the season for germs to take hold. Also, although the keyboards and tables are cleaned periodically, crumbs in the keyboard or grimy keys from dirty hands can build up over time.
    2. Log into the computer using your student credentials, lock the computer when you step away, and log out when you are done. Using your student login allows you to save files to your profile, which follows you where ever you login. You will more likely be able to recover work if something terrible should happen while you’re in the middle of working. To lock your computer when you step away, use the keyboard: Windows Key + L. Locking when you step away and logging out when you are done keeps your information and files out of the hands of whoever sits down after you.
    3. Report any issues you come across. TSS strives to have computers and printers in good working condition. If something isn’t working for you, it could go unnoticed if you do not report it. If headphones don’t get sound, there’s a fix! Report issues to Erin Greenwood, the computer lab manager, or the TSS office. They will want to know the computer number and the problem.
    This computer lab is a dedicated quiet, independent study environment. If you need to do group work, look into checking out one of the group study rooms offered by the library upstairs.